0x01 前言
随机数在许多科学和工程领域扮演着重要角色,尤其在计算机科学和信息安全领域,它的重要意义更是不可小觑。在这个全球数字化的时代,数据是我们经济和生活的核心,数据的安全和保密显得尤为重要。我们使用密码保护我们的银行账户、电子邮件、社交媒体账户,我们使用加密技术保护我们通信的隐私性。在这些过程中,随机数是其中最重要的一部分,它用于密码生成、数据加密、身份验证和网络协议安全,是保证电子交流安全的令牌。如果我们不能保证所生成的随机数实际上是随机的,那么它们就可能被预测,这将让我们面临安全风险。因此,在探讨随机数的同时,我们须深化理解随机性的安全性,以便更有效地使用随机数,保护自身和数据免受攻击。
本次分享的两个案例(CVE-2023-42820和CVE-2022-35890)均是由于随机数使用不当从而导致了更加严重的安全问题。
0x02 随机数相关基础知识
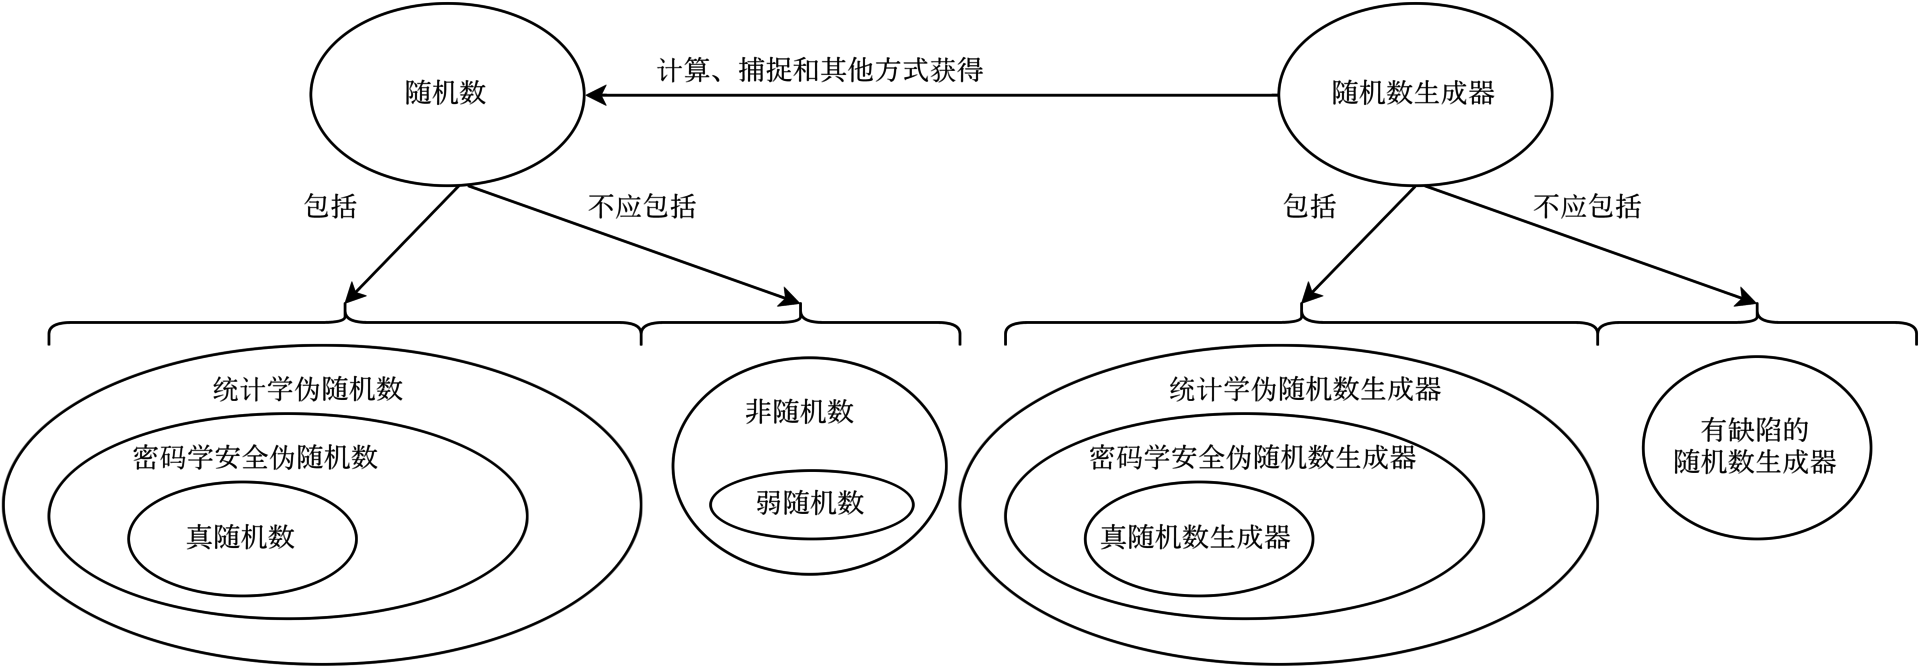
根据密码学原理,随机数的随机性检验可以分为三个标准:
- 统计学伪随机性:在给定的随机比特流样本中,1的数量大致等于0的数量,满足这类要求的数字在人类“一眼看上去”是随机的
- 密码学安全伪随机性:给定随机样本的一部分和随机算法,不能有效的演算出随机样本的剩余部分
- 真随机性:随机样本不可重现
相应的,随机数也分为三类:
伪随机数:满足第一个条件的随机数
密码学安全的伪随机数:同时满足前两个条件的随机数,可以通过密码学安全伪随机数生成器计算得出
真随机数:同时满足三个条件的随机数
- 密码学安全伪随机数生成器(CSPRNG)
相较于统计学伪随机数生成器和更弱的伪随机数生成器,CSPRNG所生成的密码学安全伪随机数具有额外的伪随机属性,简单来说CSPRNG本质上属于一种单向函数

这是一个使用python random库生成随机数的例子
>>> import random
>>> random.seed(123)
>>> random.random()
0.052363598850944326
>>> random.random()
0.08718667752263232
>>> random.seed(123)
>>> random.random()
0.052363598850944326
>>> random.random()
0.08718667752263232
>>> random.random()
0.4072417636703983
>>> random.seed(123)
>>> random.random()
0.052363598850944326
对于随机数的使用,一般是先播种,然后使用rand来获取随机数。不播种会使用默认的种子,不同的语言不通版本种子可能不一样。这种通过rand出来的随机数,就是伪随机数,只要种子固定那么每次生成的随机数序列就会一样,同时通过上面的例子,可以发现以下特点:
在播种后会重置随机序列
random.seed()进行播种时并没有产生新的对象,就会对后面的random产生影响,那么推断播种后种子对播种时的整个进程生效
- 对于Java这种有新对象生成的语言来说,如果每次都是调用的同一个对象,那么与上面的情况一致,播种后会对这个对象后面生成的随机数产生影响
public class A{
    public Random random;
    public void init(){
        long seed = 123456L;
        this.random = new Random(seed);
    }
    public static void main(){
        this.init();
        int num = this.random.nextInt(100);
        int num2 = this.random.nextInt(100);
        System.out.println(num + " " + num2);

    }
}
0x03 经典案例分析
案例1——JumpServer 任意账户密码重置(CVE-2023-42820)
JumpServer 是广受欢迎的国产开源堡垒机,是符合 4A 规范的专业运维安全审计系统
漏洞位于找回密码时,生成的6位验证码算法是伪随机,伪随机的种子可获取,从而可以预测验证码,最终重置任意账户密码
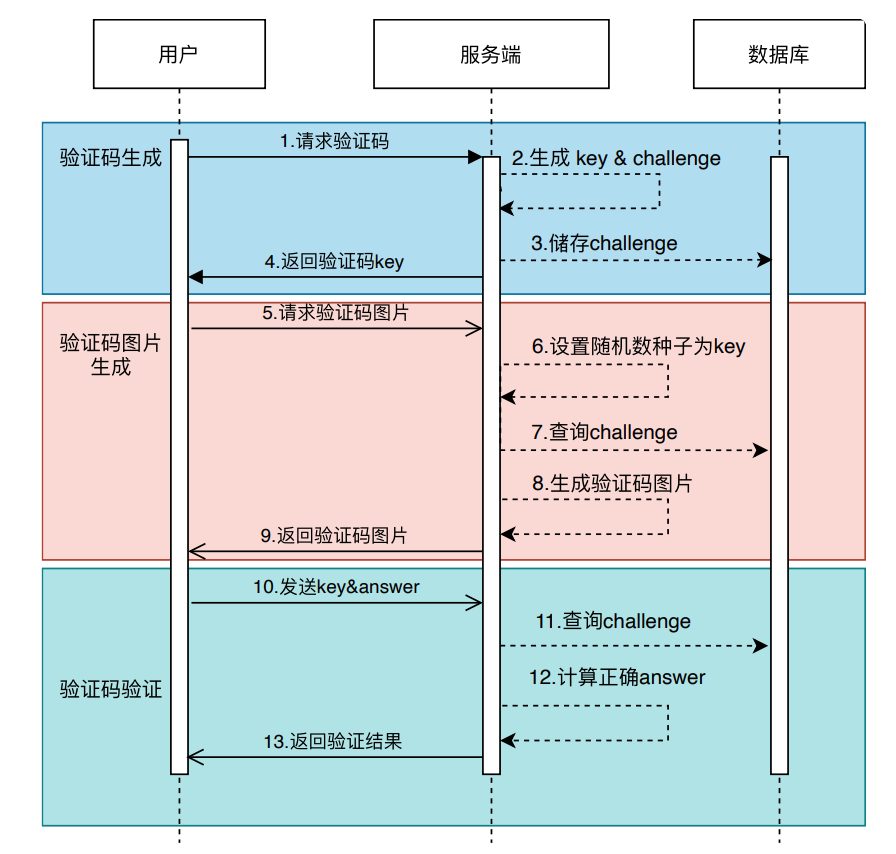
jumperserver找回密码时的流程如下图(这里借用一个知识星球中的流程图

看起来流程似乎没有问题,但问题出现在随机数种子在请求验证码图片时直接展示给用户,下面从源码入手查看逻辑
先看验证码生成的逻辑
def captcha_image(request, key, scale=1):
    if scale == 2 and not settings.CAPTCHA_2X_IMAGE:
        raise Http404
    try:
        store = CaptchaStore.objects.get(hashkey=key)
    except CaptchaStore.DoesNotExist:
        # HTTP 410 Gone status so that crawlers don't index these expired urls.
        return HttpResponse(status=410)

    random.seed(key)  # Do not generate different images for the same key
											# 这里的种子是外面传进来的参数

    text = store.challenge
...
https://github.com/mbi/django-simple-captcha/blob/master/captcha/views.py
寻找这个函数的调用处
from django.urls import re_path

from captcha import views

urlpatterns = [
    re_path(
        r"image/(?P<key>\w+)/$",
        views.captcha_image,
        name="captcha-image",
        kwargs={"scale": 1},
    ),
    re_path(
        r"image/(?P<key>\w+)@2/$",
        views.captcha_image,
        name="captcha-image-2x",
        kwargs={"scale": 2},
    ),
    re_path(r"audio/(?P<key>\w+).wav$", views.captcha_audio, name="captcha-audio"),
    re_path(r"refresh/$", views.captcha_refresh, name="captcha-refresh"),
]
https://github.com/mbi/django-simple-captcha/blob/master/captcha/urls.py#L9
可以发现key的值就存在于请求的url中,如下

这样就满足了随机数种子可知的条件
再看密码找回地方的逻辑

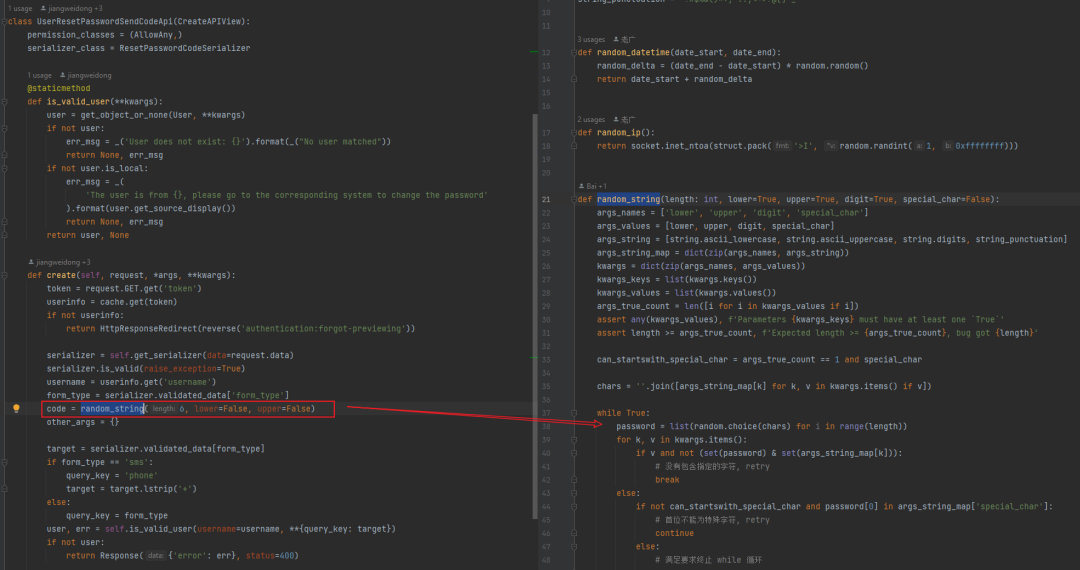
这里可以发现生成验证码也使用random函数,并且没有进行重新播种,故后续的随机序列完全可以计算出来,从而导致6位验证码可以直接计算出来
修复
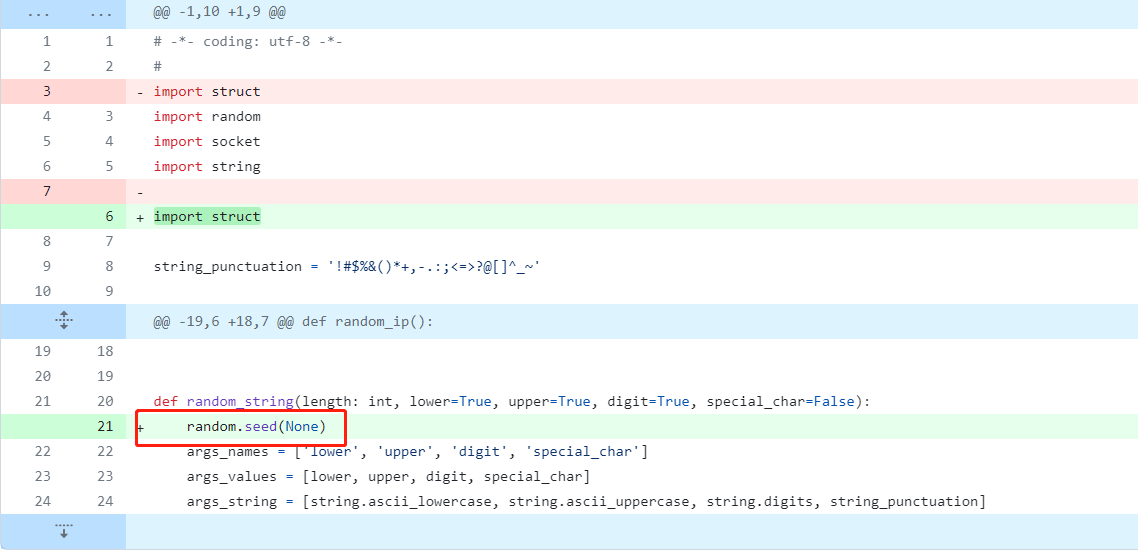
fix: 修复 random error · jumpserver/jumpserver@ce645b1 · GitHub

patch是直接重新将None作为种子进行播种
random.seed(a=None, version=2) If a is omitted or None , the current system time is used. If randomness sources are provided by the operating system, they are used instead of the system time (see the os.urandom() function for details on availability).
查看手册,使用None作为种子,则
- 使用系统提供的随机数发生器(/dev/urandom)作为种子
- 使用当前时间作为种子
这样就避免了生成6位验证码时,种子已知从而可以被预测后续随机数的情况
案例2——Inductive Ignition session劫持(CVE-2022-35890)
Inductive Automation Ignition是美国Inductive Automation公司的一套用于SCADA系统的集成软件平台。该平台支持SCADA(数据采集与监控系统)、HMI(人机界面)等
ignition 是2022年pwn2own的比赛项目,该漏洞在比赛中被使用。
漏洞源于生成session使用的算法在Windows下为伪随机函数,且未使用默认种子,还可以通过特定方法泄露出seed大概范围,最终结合一定次数的爆破即可劫持真正session
先看种子初始化的部分
private void initRandom() throws Exception {
    long seed = System.currentTimeMillis();
    char[] entropy = ENTROPY;
    for (int i = 0; i < entropy.length; ++i) {
        long update = (byte)entropy[i] << i % 8 * 8;
        seed ^= update;
    }
    this.random = new SecureRandom();
    this.random.setSeed(seed);
    this.digest = MessageDigest.getInstance("SHA-1");
}
initRandom位于GatewaySessionManager刚启动时,这里初始化了种子,使用的随机函数为java.security.SecureRandom()
public GWSession createSession() {
    GWSession session = new GWSession(this.generateSessionId());
    session.startup(this.context);
    this.sessions.put(session.getId(), session);
    this.log.debug((Object)("Created new session: " + session.getPublicId()));
    this.statusTags.refresh();
    return session;
}
创建session位于用户成功登录处,再看具体生成session的算法
protected synchronized String generateSessionId() {
    byte[] random = new byte[16];
    String result = null;
    StringBuffer buffer = new StringBuffer();
    do {
        int resultLenBytes = 0;
        if (result != null) {
            buffer = new StringBuffer();
            ++this.duplicates;
        }
        while (resultLenBytes < this.sessionIdLength) {
            this.random.nextBytes(random);
            random = this.digest.digest(random);
            for (int j = 0; j < random.length && resultLenBytes < this.sessionIdLength; ++resultLenBytes, ++j) {
                byte b1 = (byte)((random[j] & 0xF0) >> 4);
                byte b2 = (byte)(random[j] & 0xF);
                if (b1 < 10) {
                    buffer.append((char)(48 + b1));
                } else {
                    buffer.append((char)(65 + (b1 - 10)));
                }
                if (b2 < 10) {
                    buffer.append((char)(48 + b2));
                    continue;
                }
                buffer.append((char)(65 + (b2 - 10)));
            }
        }
    } while (this.sessions.get(result = buffer.toString()) != null);
    return result;
}
这里使用了this.random生成随机数,也就是上面播种了时间戳作为种子的随机函数,那么可能存在被预测的风险
查询java.security.SecureRandom在windows平台上底层调用的函数,在stack overflow上找到了类似的问题
Q: I am interested in
java.util.Randomandjava.security.SecureRandomclasses. I found thatRandomuses system clock to generate seed andSecureRandomuses/dev/randomor/dev/urandombut these files are on Linux, while on Windows it uses some misticCryptGenRandom. Even if that is super secure function, do we know from where does it take values? What is the basement to generate seed?我对 java.util.Random 和 java.security.SecureRandom 类感兴趣。 我发现 Random 使用系统时钟生成种子,SecureRandom 使用 /dev/random 或 /dev/urandom,但这些文件位于 Linux 上,而在 Windows 上则使用一些神秘的 CryptGenRandom。 即使这是超级安全的函数,我们知道它从哪里获取值吗? 生成种子的底层逻辑是什么?
A: In Windows SecureRandom uses the method CryptGenRandom that is part of WinCrypt Windows library (Included in Advapi32.dll of Windows System libraries).
在 Windows SecureRandom 中,使用 CryptGenRandom 方法,该方法是 WinCrypt Windows 库的一部分(包含在 Windows 系统库的 Advapi32.dll 中)
下面是微软官方手册对CryptGenRandom的描述(节选)
Software random number generators work in fundamentally the same way. They start with a random number, known as the seed, and then use an algorithm to generate a pseudo-random sequence of bits based on it. The most difficult part of this process is to get a seed that is truly random. This is usually based on user input latency, or the jitter from one or more hardware components.
软件随机数生成器的工作方式基本相同。 他们从一个随机数(称为种子)开始,然后使用算法生成基于它的`伪随机位序列。 这个过程中最困难的部分是获得真正随机的种子。 这通常基于用户输入延迟或来自一个或多个硬件组件的抖动。
通过手册,我们可知Windows底层调用的是个伪随机函数,并且默认情况下使用的种子是一个很难预测的值,但是ignition中错误的使用了系统时间作为种子
如何获得伪随机种子?
在ignition gateway中,有一个特殊的servlet,scriptModules 用于获取第三方的脚本,最终将其打包返回一个zip
直接跟到对应逻辑处
void zipThirdPartyScriptModulesAndCalcHash() {
	  this.thirdPartyZipValid = false;
	  Object object = this.thirdPartyZipLock;
	  synchronized (object) {
	      if (this.thirdPartyZipValid) {
	          return;
	      }
	      try {
	          File pylibDir = this.getThirdPartyScriptModulesDir();
	          ZipMap zipMap = new ZipMap();
	          this.addDirToZip(pylibDir, pylibDir, zipMap);
	          File tempFile = new File(this.systemManager.getTempDir(), "pylib_compressed.zip");
	          zipMap.writeToFile(tempFile);
	          this.thirdPartyScriptModulesHash = Files.hash((File)tempFile, (HashFunction)Hashing.md5()).toString();
	      }
	      catch (Exception e) {
	          this.log.error("Error calculating 3rd party script zip hash.", (Throwable)e);
	          this.thirdPartyScriptModulesHash = null;
	      }
	      finally {
	          this.thirdPartyZipValid = true;
	          this.thirdPartyZipLock.notifyAll();
	      }
	  }
}
pylib_compressed.zip在每次ignition启动时都会重新生成,对于文件来说会有一个最后修改时间的属性,同时上面所说的随机数初始化时使用的时间戳也会与这个时间接近
查看启动日志可以看到先生成了seed后启动ignition gateway,那么只需要在zip的最后修改时间值减去delay即可,一般来说2s足矣
那么在爆破seed时如何知道当前session是否正确?
在gateway中处理数据包时存在如下逻辑
if (!versionHash.isDev() && msg.getVersion() != 0L && versionHash.getHash() != msg.getVersion()) {
		if (session != null) {
		    session.setMaxInactiveInterval(10);
		}
		this.printErrorResponse((PrintWriter)out, 309, "Version mismatch", false);
		return;
}
此处逻辑位于session校验之后,也就是说故意设置错误的version,当session验证通过时,即可在返回包中看到309的响应
至此完成了整个session劫持的流程
重新梳理一下整个流程:
通过scriptModules获取到ignition启动的时间 → 将时间-delay作为初始种子 → 使用初始种子计算session → 验证当前session是否正确 → 种子+1(直至正确)
修复
查看修复后的版本代码
protected synchronized String generateSessionId() {
    String result;
    do {
        result = AuthUtil.generateRandomBase64String(32);
    } while(this.sessions.get(result) != null);

    return result;
}
新版本直接删掉了initRandom函数,并修改了生成session的逻辑,跟进
public static String generateRandomBase64String(int entropyCountInBytes) {
	  assert entropyCountInBytes > 0;

	  byte[] bytes = new byte[entropyCountInBytes];
	  SecureRandomProvider.get().nextBytes(bytes);
	  return BASE64_ENCODER.encodeToString(bytes);
}
继续跟进
public void nextBytes(byte[] bytes) {
	  LOG.tracef("nextBytes(bytes.length=%s)...", new Object[]{bytes.length});
	  this.secureRandom.nextBytes(bytes);
	  LOG.trace("Done.");
}
看到使用的函数仍然是伪随机函数,查看seed是否可以推测
private SecureRandomProvider() throws NoSuchAlgorithmException {
    LOG.debug("Creating SecureRandom object...");
    this.secureRandom = SecureRandom.getInstance("SHA1PRNG");
    byte[] seed = new byte[128];
    (new Random()).nextBytes(seed);
    this.secureRandom.setSeed(seed);
    this.secureRandom.nextBytes(new byte[128]);
    (new Thread(new SeedGenerator(), "secure-random-seed-gen")).start();
    LOG.debug("... SecureRandom Created.");
}
这里seed生成虽然使用了伪随机函数random().nextbytes(),(random函数默认使用timestamp作为种子)但是由于每次生成session时都需要调用一遍这个流程,使用的seed为当前时间,所以每次生成session时的seed没法通过之前的方法进行推测,从而使得session的值不可计算,最终防止了session被劫持的风险
这里还有另一种修复方法,即使用java.security.SecureRandom默认种子即可,不进行setseed
0x04 漏洞模式总结
使用不安全的随机函数 → 种子可知/可预测 → 随机数可计算 → 造成更严重的安全问题
上面的两个案例的修复方法均是对种子进行处理,防止种子可以被预测,从而修复原有的安全问题
同样,也可以通过将伪随机函数修改为安全随机函数的方法来解决上述安全问题(但安全随机函数可能并没有伪随机函数效率高)
| 语言 | 常见伪随机函数 | 安全随机函数 |
|---|---|---|
| C | srand | linux 使用/dev/urandom |
| rand | Windows使用CryptGenRandom并使用默认种子 | |
| C++ | mt19937 | C++使用std::random_device 类来获取安全的随机种子 |
| default_random_engine | ||
| python | random | secrets |
| java | java.security.SecureRandom //强伪随机函数 | SecureRandom.getInstanceStrong |
| java.util.Random //弱伪随机数 | ||
| php | mt_scrand mt_rand | random_bytes |
| C# | Random | System.Security.Cryptography.RNGCryptoServiceProvider |
| golang | math/rand | crypto/rand |
如果种子不可预测,那么伪随机数序列就难以预测,称为强伪随机数
如果种子可预测,那么随机数序列就通常可以预测,称为弱随机数
0x05 Reference
jumpserver最新re-auth复现(伪随机经典案例)
Jumpserver随机数种子泄露导致账户劫持漏洞(CVE-2023-42820)
A pre-authenticated RCE exploit for Inductive Automation Ignition
